- Published on
The SSL/TLS Certificate Lifecycle: A Quick Guide
- Authors

- Name
- Amit Bisht
Introduction
SSL/TLS certificates are essential for establishing secure communication between servers and clients by encrypting data and ensuring authenticity. In this blog we will learn some theoritical concepts and do some practicles.
Here's a detailed guide to understanding the lifecycle and components involved of these certificates, from creation to validation:
- Creating an SSL/TLS Certificate
- Types of SSL/TLS certificates
- Using an SSL/TLS Certificate
- Validating an SSL/TLS Certificate
- Enough Theory! Time to Get Our Hands Dirty
Creating an SSL/TLS Certificate
Private Key: A secret key generated by the server, which must be kept confidential. It is used to decrypt data that clients encrypt using the public key. If compromised, the security of the entire connection is at risk.
Public Key: This key is paired with the private key and is shared publicly via the SSL/TLS certificate. It allows clients to encrypt data before sending it to the server. The server then decrypts the data using its private key.
Certificate Signing Request (CSR): The CSR is a file that contains the public key and the domain information of the server. It's sent to a Certificate Authority (CA) to request a certificate. The CA verifies the information and generates the SSL/TLS certificate.
Certificate Authority (CA): A CA is a trusted third-party organization responsible for verifying the identity of certificate applicants. Upon validation, it issues the SSL/TLS certificate. Examples of well-known CAs include Let’s Encrypt, DigiCert, and GlobalSign.
Let’s Encrypt: A popular, free Certificate Authority that provides SSL/TLS certificates. It automates the process of issuing and renewing certificates, making it easier for anyone to secure their websites.
Paid vs Free Certificate Authorities (CA)
Feature Free CA Paid CA Cost Free (e.g., Let’s Encrypt) Varies (from modest to expensive) Type of Certificates Primarily Domain Validation (DV) Offers DV, Organization Validation (OV), Extended Validation (EV), Wildcard, Multi-domain certificates Certificate Validation Basic Domain Validation (DV) only Offers DV, OV, and EV certificates with more stringent identity verification (e.g., business and organization details) Support Limited or community-based support 24/7 dedicated customer support, live chat, and phone options depending on provider Automation Automated issuance and renewal Some paid CAs offer automation; others require manual renewal Lifespan of Certificates Typically 90 days (automatic renewal) 1-2 years (renewal required but may offer discounts for multi-year purchase) Security Level Same encryption standards (e.g., 256-bit) Same encryption standards but OV and EV offer additional identity assurance Trustworthiness Trusted by most browsers and devices Trusted by all major browsers, with more robust trust for OV and EV certificates Additional Features Basic SSL encryption only Features like warranty, liability protection, site seals (trust badges), and vulnerability assessments Wildcard & Multi-domain Typically not offered Widely available for Wildcard and Multi-domain certificates Use Cases Small websites, blogs, non-commercial sites Business websites, e-commerce, financial institutions, and larger enterprises requiring more assurance Root Certificate: At the top of the trust hierarchy is the root certificate, which is self-signed and included in trusted root stores of web browsers and operating systems. These are pre-installed on client devices to authenticate the server’s certificate.
Types of SSL/TLS certificates
| Certificate Type | Scope | Use Case | Cost |
|---|---|---|---|
| Single Domain | One domain (e.g., example.com) | Basic websites, blogs | Most affordable |
| Wildcard | Domain + unlimited subdomains (*.example.com) | Websites with multiple subdomains | Moderately expensive |
| Multi-domain (SAN) | Multiple domains (e.g., example.com, example.net) | Companies with several domains | Cost-effective for multiple domains |
| Extended Validation (EV) | Single or multiple domains, high trust | High-trust websites like financial or government | Most expensive |
| Organization Validation (OV) | One or more domains, business validation | Medium-trust sites that need more assurance | Mid-range cost |
Using an SSL/TLS Certificate
SSL/TLS Handshake: This is the negotiation phase when the server and client agree on encryption algorithms and authenticate each other’s identities. It establishes a secure session by exchanging public keys and creating session keys.
Server Certificate Installation: After obtaining the SSL/TLS certificate from the CA, it must be installed on the web server. Intermediate certificates also need to be included to complete the certificate chain and ensure trust.
Certificate Chain: A certificate chain consists of the server’s SSL/TLS certificate, any intermediate certificates, and the trusted root certificate. This chain allows the client to verify the validity of the server’s certificate.
Secure Session: Once the handshake completes, a secure session is established, and all data exchanged is encrypted. This ensures the confidentiality, integrity, and authenticity of the communication between the client and server.
Validating an SSL/TLS Certificate
Certificate Verification: When a client connects to a server, it verifies the SSL/TLS certificate by checking its authenticity. This includes verifying that the certificate is signed by a trusted CA, hasn’t expired, and is linked to a valid certificate chain.
Certificate Revocation Checks: To ensure that a certificate hasn’t been revoked before its expiration, the client checks for revocation using mechanisms such as Certificate Revocation Lists (CRLs) or the Online Certificate Status Protocol (OCSP).
Public Key Infrastructure (PKI): PKI is the framework that governs the management of digital certificates and public-key encryption. It includes the CA, certificate repositories, and policies to ensure secure communication.
Certificate Stores: These are repositories on client devices where certificates and private keys are stored. They include trusted root certificates that allow the client to trust certificates signed by recognized CAs.
Enough Theory! Time to Get Our Hands Dirty
We'll cover the entire process, from creating an API to running it on port 443 and deploying it on an EC2 instance.
Docker knowledge is must to proceed ahead
Code can be found on my github account
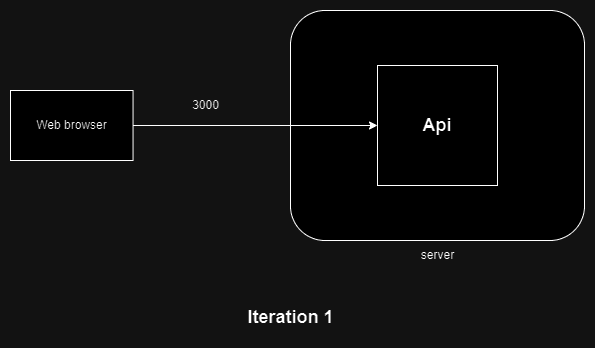
- Iteration 1: Creating a simple Node.js API running on port 3000
Code for api: https://github.com/mythLabs/blog-content/tree/main/ssl-tls-components/api
services:
  api:
    build:
      context: ./api # Directory containing the Dockerfile and nginx.conf
    container_name: api
    ports:
      - "3000:3000"
    command: npm start # Adjust the command to run your API
    networks:
      - app-network

networks:
  app-network:
    driver: bridge
This is a simple Compose file that runs our API and exposes it on port 3000.
Build the image and start with below commands.
docker compose build
docker compose up
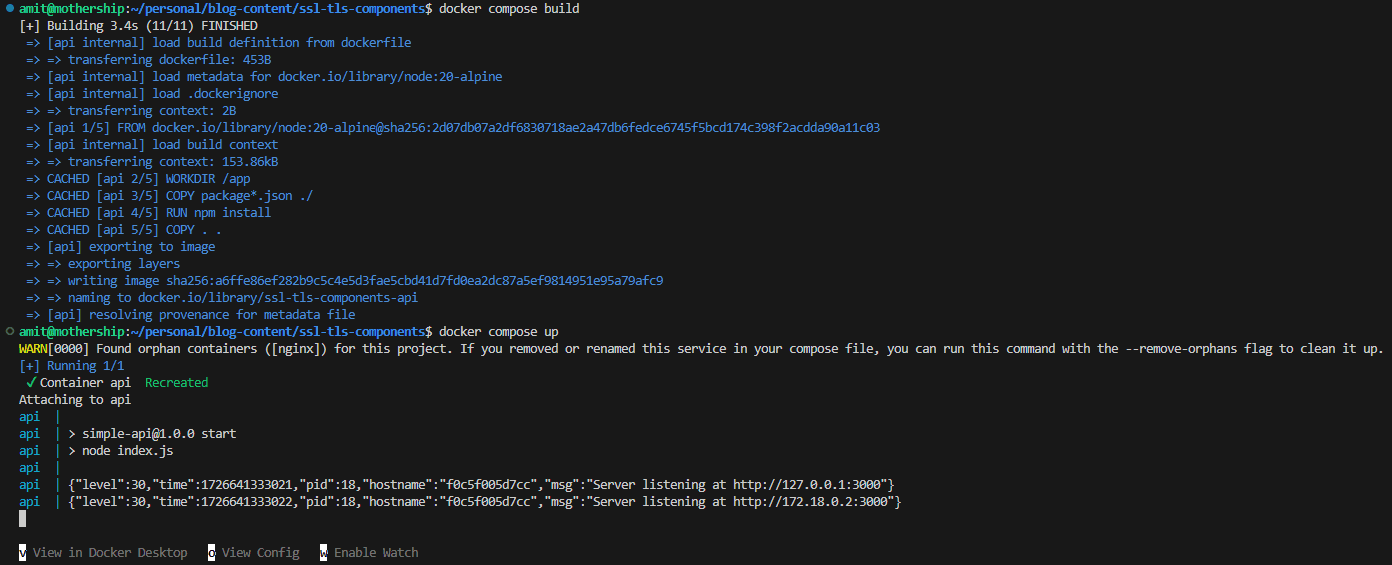
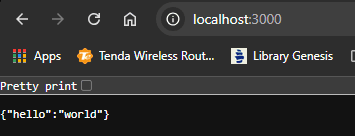
The api runs fine
- Iteration 2: Set up an Nginx reverse proxy in front of the API to handle traffic on port 80.

services:
  api:
    build:
      context: ./api
    container_name: api
    command: npm start
    networks:
      - app-network

  nginx:
    image: "nginx"
    container_name: nginx
    volumes:
      - ./nginx/nginx.conf:/etc/nginx/nginx.conf:ro
    ports:
      - "80:80"
    depends_on:
      - api
    networks:
      - app-network

networks:
  app-network:
    driver: bridge
In this updated Compose file, you'll see a new service, Nginx, which is exposed on port 80. We'll access Nginx on port 80, and it will forward traffic to our API running on port 3000. The logic for forwarding is defined in Nginx's configuration file, which is mounted via bind mounts.
events {
    worker_connections  1024;
}

http {
    upstream api {
        server api:3000;
    }

    server {
        listen 80;

        location / {
            proxy_pass http://api;
            proxy_set_header Host $host;
            proxy_set_header X-Real-IP $remote_addr;
            proxy_set_header X-Forwarded-For $proxy_add_x_forwarded_for;
            proxy_set_header X-Forwarded-Proto $scheme;
        }
    }
}
In this configuration, the events block allows each worker to handle up to 1024 connections. The upstream block defines the backend server at api:3000. The server block listens on port 80 and forwards requests to api:3000, passing along important headers such as the client's real IP and request protocol.
docker compose up
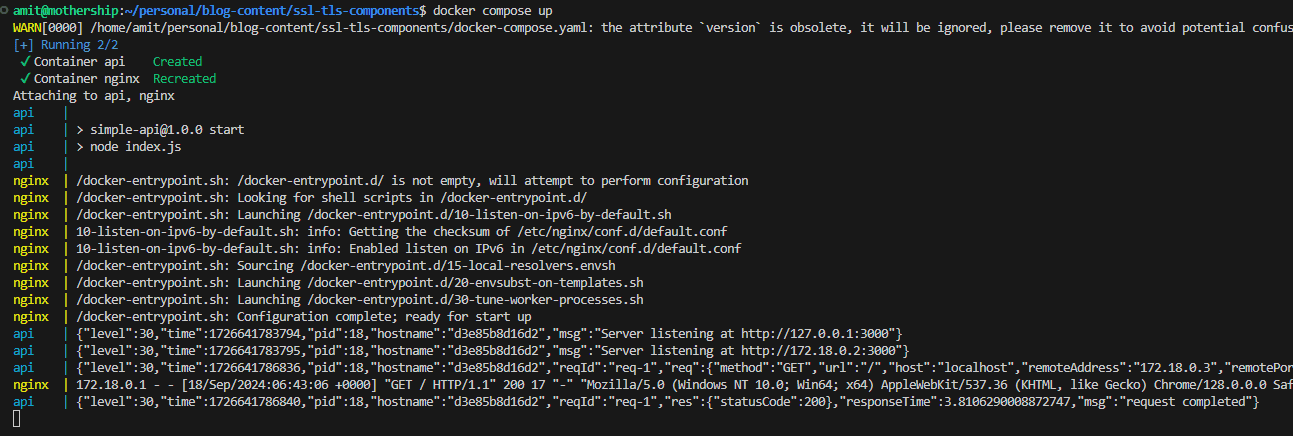
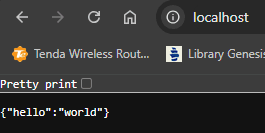
The API is served on port 80. [If we don’t specify a port in the URL and use HTTP, the browser automatically defaults to port 80 for the request.]
Iteration 3: Next, we'll make our API accessible on port 443.

We will be exposing the API on port 443, but since this is on our localhost, we don't need certificates from a CA. Instead, we'll generate self-signed certificates, which our computer will recognize. Run the following command inside the Nginx folder, alongside the Nginx configuration file. here
openssl req -x509 -nodes -days 365 -newkey rsa:2048 -keyout nginx-selfsigned.key -out nginx-selfsigned.crt -subj "/CN=localhost"This command will generate two files that we will provide to Nginx for use with the SSL connection.
docker-compose.yamlservices: api: build: context: ./api # Directory containing the Dockerfile and nginx.conf container_name: api command: npm start # Adjust the command to run your API networks: - app-network nginx: image: "nginx" container_name: nginx volumes: - ./nginx/nginx.conf:/etc/nginx/nginx.conf:ro - ./nginx/nginx-selfsigned.crt:/etc/nginx/ssl/nginx-selfsigned.crt:ro - ./nginx/nginx-selfsigned.key:/etc/nginx/ssl/nginx-selfsigned.key:ro ports: - "80:80" - "443:443" depends_on: - api networks: - app-network networks: app-network: driver: bridgeNow, this has been updated to use the files we generated. Both files are mounted to
/etc/nginx/sslin the Nginx container for it to read.nginx.confevents { worker_connections 1024; } http { upstream api { server api:3000; } server { listen 80; server_name localhost; # Redirect HTTP to HTTPS location / { return 301 https://$host$request_uri; } } server { listen 443 ssl; server_name localhost; # SSL Certificate and key ssl_certificate /etc/nginx/ssl/nginx-selfsigned.crt; ssl_certificate_key /etc/nginx/ssl/nginx-selfsigned.key; ssl_protocols TLSv1.2 TLSv1.3; ssl_ciphers HIGH:!aNULL:!MD5; location / { proxy_pass http://api; proxy_set_header Host $host; proxy_set_header X-Real-IP $remote_addr; proxy_set_header X-Forwarded-For $proxy_add_x_forwarded_for; proxy_set_header X-Forwarded-Proto $scheme; } } }The first server section listening on port 80 will be used to forward traffic but will redirect it to an HTTPS link.
The second server section listens on port 443, where we provide the SSL certificate locations. This section will now forward the traffic.

The API is now served over HTTPS, but it is not fully secure because it uses a self-signed certificate. This is generally used for local development with SSL when required.

If we try to access it using HTTP, it will redirect. We can see an HTTP 301 status being returned for the HTTP request.
Iteration 3 on server: We will now deploy our API to an EC2 server using actual SSL certificates.
In the last example, we created certificates ourselves. However, to do it correctly, we need certificates provided by a certificate authority (CA). We create certificate files ourselves, then generate a certificate signing request (CSR) for the CA. After signing the files, the CA authorizes them for use after confirming that we actually own the domain.
We will use the free certificate authority known as Let's Encrypt. The process of obtaining the certificate is streamlined by using Certbot.
Certbot generates the certificate, while Let's Encrypt performs domain validation by accessing a URL on our server.When we run Certbot, it places a challenge file in the /.well-known/acme-challenge/ location on the server. Let's Encrypt then queries this URL, http://yourdomain.com/.well-known/acme-challenge/, for domain validation. This ensures that you own the domain, and you should set your DNS to route traffic to your EC2's IP address.
- Create an ec2 instance with public IP


Nothing is currently being served on this IP.
- Lets start by setting up DNS. I own the domain of this blog website, amitbrewscode.in, so I will map the subdomain api.amitbrewscode.in to the public IP.


Install docker on ec2
Setup Code and run
docker-compose:docker-compose.yamlservices: nginx: image: "nginx:1.27.1-alpine-slim" container_name: nginx ports: - 80:80 - 443:443 restart: always networks: - app-network networks: app-network: driver: bridge
A simple Compose file to run Nginx and check if traffic is flowing to EC2.
docker compose up
compose running on EC2

Default nginx page served on 80
Install Certbot
Certbot is a powerful and user-friendly tool that automates the process of obtaining and renewing SSL/TLS certificates from Let's Encrypt, a free certificate authority.
Designed to simplify the deployment of HTTPS, Certbot handles domain validation, certificate issuance, and renewal, allowing website owners to secure their sites with minimal effort. By using Certbot, you can easily set up a secure connection for your web applications, ensuring data integrity and confidentiality for your users.
Setup nginx, certbot containers
Before requesting certificates, we need to do the following:
- A common folder/volume needs to be shared by the Certbot and Nginx containers, as Certbot will write the challenge file and the Nginx container will serve that file.
- A common certificate folder where the Certbot container will write the certificates, which the Nginx container will then use.
docker-compose:docker-compose.yamlservices: api: build: context: ./api container_name: api command: npm start networks: - app-network nginx: image: "nginx:1.27.1-alpine-slim" container_name: nginx ports: - 80:80 - 443:443 restart: always volumes: - ./nginx/nginx.conf:/etc/nginx/nginx.conf/:ro #nginx config - ./certbot/www:/var/www/certbot/:ro #challenge file - ./certbot/conf/:/etc/nginx/ssl/:ro #certificates depends_on: - api networks: - app-network certbot: image: certbot/certbot:latest volumes: - ./certbot/www/:/var/www/certbot/:rw - ./certbot/conf/:/etc/letsencrypt/:rw networks: - app-network networks: app-network: driver: bridgeWe can see that the folder ./certbot/www/ is where the challenges will be stored and served from, while the folder ./certbot/conf/ is where the certificates will reside.
nginx.confevents { worker_connections 1024; } http { upstream api { server api:3000; } server { listen 80; listen [::]:80; server_name api.amitbrewscode.in www.api.amitbrewscode.in; server_tokens off; location /.well-known/acme-challenge/ { #Used for Domain validation by lets's encrypt root /var/www/certbot; } location / { return 301 https://api.amitbrewscode.in$request_uri; } } }This Nginx setup is required for Let's Encrypt to access the challenge at http://api.amitbrewscode.in/.well-known/acme-challenge/ for domain validation.
docker compose up
DNS mapping and redirect is working
Now, run the Certbot command with the --dry-run option to check if the setup is correct, followed by the actual command.
docker compose run --rm certbot certonly --webroot --webroot-path /var/www/certbot/ --dry-run -d api.amitbrewscode.in
dry run result
docker compose run --rm certbot certonly --webroot --webroot-path /var/www/certbot/ -d api.amitbrewscode.in
Domain validation successful and certificates generated
nginx.confevents { worker_connections 1024; } http { upstream api { server api:3000; } server { listen 80; listen [::]:80; server_name api.amitbrewscode.in www.api.amitbrewscode.in; server_tokens off; location /.well-known/acme-challenge/ { root /var/www/certbot; } location / { return 301 https://api.amitbrewscode.in$request_uri; } } server { listen 443 ssl; server_name api.amitbrewscode.in; ssl_certificate /etc/nginx/ssl/live/api.amitbrewscode.in/fullchain.pem; ssl_certificate_key /etc/nginx/ssl/live/api.amitbrewscode.in/privkey.pem; ssl_protocols TLSv1.2 TLSv1.3; ssl_ciphers HIGH:!aNULL:!MD5; location / { proxy_pass http://api; proxy_set_header Host $host; proxy_set_header X-Real-IP $remote_addr; proxy_set_header X-Forwarded-For $proxy_add_x_forwarded_for; proxy_set_header X-Forwarded-Proto $scheme; } } }This is the final nginx.conf configuration, where a server listens on port 443 with the certificates and forwards traffic to our API.

Our api is now served with https on our domain

some details about cert
Certbot can assist with automatic certificate rotation—just set it up and forget about it. We will discuss this in another blog.
Thanks for reading!